Thursday, June 19, 2014

Fun and useful....

Pinterest. Just the thought of Pinterest makes you a happy person... Or is that just me? I could easily spend hours searching through Pinterest. It's addicting as I'm sure you can already confirm this for yourself. 

Pinterest is a great site to help catapult your ideas. I've been so inspired by the things I've come across. Lately, I've been trying to find some things around my house to reinvent. It's fun for me and makes me feel like I'm getting full use of something. 

I don't know about you but I love creamer. Yep. No matter how "clean" I try to eat I just can't knock the creamer. Recently on Pinterest I noticed a similar creamer bottle being reused. To me, this was genius. 

After washing it I decided to store gold fish in it. This container makes traveling easy, it doesn't pour out fast when opening it and turning it over and it snaps closed which keeps it fresh. 


The next item I had in my home was a foam noodle for the pool. Mind you we do not have a pool. Last summer my kids begged me to buy a few at the dollar store so I did. For the past year they have been driving me bananas as they serve no purpose in our hall closet and my children have lost interest in it long ago. A while ago I saw a pic on Pinterest of a foam noodle being used as a bath toy. The pic I saw was a noodle cut up and placed in the tub.... Well, I did exactly that....

It was so neat to see my kids reactions to this. They were so excited and the cut foam entertained for quite some time, which allowed me to sit and watch them in controlled and happy peace. 


Saturday, May 31, 2014

Tissue Paper Pom Pom Tutorial

Inexpensive, easy and fun!! Have I got your attention? 

Tissue paper pom pom's are incredibly inexpensive. You can find tissue paper at the dollar store! If you're looking for a specific color then the price can range but usually it's still very inexpensive. These adorable creations are the perfect items for a party, as wall decor, hanging from the ceiling and even as center pieces!! Use these as every day home decor too! Believe me, they're so cute you'll want to place them all around your home. 

I'm sure you've heard of these an perhaps you've been curious about how to make them, we'll check out the info below for an easy tutorial on how to do so....

Step:

1.) I'm sure many people do it differently but for me this is what I used.. 
Tissue paper- 8-10 sheets (got mine at the dollar store)
Scissors
Something to cinch the tissue paper and keep it secure. 

2.) Fold your tissue paper accordion style.

3.) Secure center. I used little metal wire.

4.) Cut the outer edges in either a circular curve or a point. 

5.) Now, GENTLY, GENTLY, and GENTLY start separating each piece of tissue paper to create either a complete circle to hang from the ceiling or flat on one side to hang on walls. Expect to rip a piece of your tissue paper your first time trying. It happens- no biggie. Just trim that part with your scissors or fluff more of the tissue paper around it and you should be able to hide the rip.  

6.) And done! As you can see I started off with a different color tissue paper with rounded edges and posted the final pictures of pastel colors with pointed edges. These make fun and creative additions to any room. My daughter especially enjoys these all over her room.

Thanks for checking this out and HAPPY CRAFTING! 

Tuesday, February 4, 2014

Homemade Strawberry Pop Tarts~ Heart Shape

I'm definitely NOT skilled in the art of cooking and baking. I flop more than I succeed, but every now and then magic happens. On occasions I make something that is more than just edible- it's actually really, REALLY tasty! haha! 
Don't you love when that happens?! 
Anywho- here's a quick recipe for delicious and somewhat nutritious homemade pop tarts...
Ingredients for dough: 
-2 cups flour (I used wheat flour although take note that your pop tarts will be a bit harder with wheat flour.)
-1tbls sugar
-1tsp salt (I used Himalayan pink salt) 
-1cup butter (I only used 1/2 cup butter because I ran out and substituted 1/4 sawfflower oil) 
1 large egg
2tbs milk
**** mix all dry then add wet ingredients. Mix dough, sprinkle some flour on flat surface, roll out dough and use cookie cutter to form shape that you desire. 
BAKE at 350 degrees for 15-20min. Times vary... Keep an eye on it!
*NOTE: you will be cutting out a heart (or whatever shape you choose) for both bottom and top, then will pinch around the pastry to "seal" it.

Filling: 
I used 3/4c Costco's organic strawberry jam.
3-4 fresh strawberries chopped.
2tbls corn starch 
1tsp water

Frosting:
I didn't use measurements for this... Sorry. But good news is it's pretty easy and totally upto your taste buds on how much you want to add...
Use powdered sugar, pure vanilla extract, butter and a little milk. That's it. I kept mixing until the taste and consistency was what I wanted. 

I drizzled the frosting on top and added sprinkles for a fun finish! 
Like I mentioned before, I'm no master chef/baker... But my kids and I really enjoyed this and I'm sure you'll be able to add your own spin to make these even better! Enjoy! 


Saturday, January 25, 2014

Create your own clothing/accessory labels! Cheap & easy to make!

Having labels on your handmade items adds a professional touch while also branding yourself and appealing to wholesale markets! 
Not everyone has the time or wants to deal with making their tags by printing from their computer, ironing from the paper to fabric etc. Not everyone wants to spend $$ on lavish tags. Well, these tags are definitely inexpensive, easy to make and cute. Although they aren't anything fancy they do allow your own personal touch to truly be added to this from designing how it will look to how you write your company name. 
Take a look at these pics to see how I constructed mine!

I purchased Muslin material as well as a fun, funky print. I chose a purple fabric pen. 
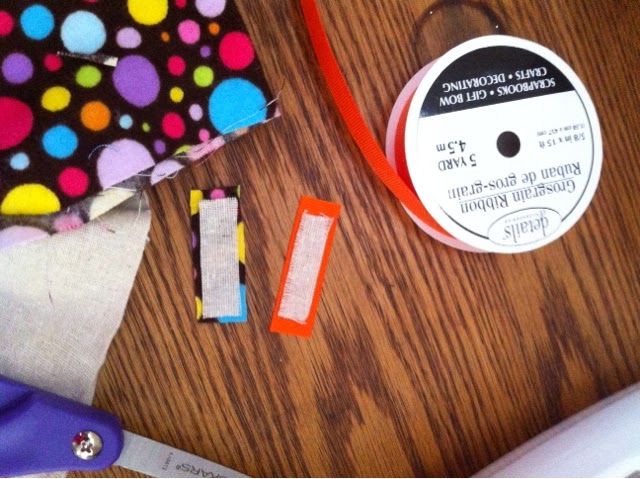
I also chose a vibrant orange ribbon as a possible "backing" (later pics will show what I mean) for label. 
Cut material any size of your choosing.
Place the Muslin material, which would be cut slightly smaller than colorful fabric, over the colorful fabric. 
Write your name BEFORE you cut.... I wrote the name after cutting. I don't recommended doing that. 😁
Sew your tag into your item! 😀🌟🌻
Here is an item I made with the tag sewn into the top right hand side. 

It's a simple, inexpensive, and personal way to add your label to the wonderful items you create! 

~Cheri


Monday, January 13, 2014

Make your own Bath Melts!

During this time of year my skin is extremely dry. I'm not talking just a little dryness...I'm talking cracked and bleeding dry skin. Nice, huh?!

I love buying beauty products from cool places such as LUSH Cosmetics. They're awesome and they're also a wee bit costly for me so I only venture out to them once in a blue moon.

I found a cool recipe for homemade bath melts on ecoyogini.blogspot.com . I changed it up a bit due to what ingredients I had on hand.

Here's what you'll need:

4 Tsp Cocoa Butter
4 Tsp Coconut Oil
1/4 cup Almond Oil (A little less would be fine)
Beeswax (This is the part you need to get a bit creative with. I added roughly around 4 Tsp of beeswax to                     add a little hardening to these so they didn't just melt the moment they left the fidge. Add a little                     more or less depending on what you think. Let me know if you add an amount that works better!)
8-12 drops of essential oil ( I used Eucalyptus EO)
5-8 drops of Tangerine EO <-----optional

Use a double boiler and melt all ingredients together, except EO,  over med/low. Remove and add EO. I used an ice tray that I purchased at the dollar store and put oatmeal in each "molding" before pouring mixture. Pour your mixture into the cube molds and place in the fridge for an hour and then they're ready for use! Just drop 1/2-1 melt in  a hot bath and viola!

NOTE: It is recommended to keep these melts in the fridge until use due to potentially melting in room temperature. ALSO, a reminder that these melts will create a slippery bath. Use with caution when entering and exiting your bath tub.

Enjoy!
Cheri
Eucalyptus & Tangerine with Oatmeal Bath Melts


Monday, January 6, 2014

New name, same gal!

Hey there! It's been a while since I've made a post. Sorry about that.... you forgive me, right? This past year has truly been a whirlwind; new baby, school for kids, school for me, yada, yada , yada. Finally the calm has come after the storm and I'm able to get back to some of my beloved hobbies.

Having 4 kids has been wonderful----ly tiring and painful at times. No solid sleep for months at a time will surely cripple you into this horrific monster. No sleep, a teething baby, a potty training and needy 3 year old, a diva 5 year old and a know-it- all 7 year old. These 4 kids are my world. I love them more than anything. These 4 children have also caused me to creep to the corners of insanity. Being a parent is no joke. Down right difficult and I love every bit of it. Yes, even those sleepless nights because there will come a time when they wont be little babies waking me, they will be teens causing me heart attacks.

So in order to keep my sanity I like to create things. I love "Do it yourself" (DIY) type stuff. Last night I made some awesome bath melts. The bath melts would make perfect gifts!I'll post pics and ingredients on the blog later so keep a look out! And keep a look out for my bath bomb post too!

Take Care,
Cheri

Saturday, June 9, 2012

Home Alone!!!

My house is quiet. Yes, absolutely quiet. I can hear the birds outside, the fridge running, the quick tapping of my keyboard. Why is it so quiet in my home, you ask? Well, daddy decided to take the kids to the park and that leaves me ALL ALONE!! It's amazing how strange it feels to be "kid free". I'm almost positive that any second one of my kids will ask for something to drink or complain about the other one taking his or her toys. I wait for the screaming and yelling to take place but nothing. Nada. Zip.

My mind is running with idea's of what to do....gym? Shopping? Cleaning (BOO)....... I feel like I've won a prize and have yet to claim it. So, what in the world shall I do?? Do other mom's have this problem? That when left completely alone you have no idea what to do? My children are with me everyday so it feels pretty foreign when they're not with me. While I'm sitting here thinking of all the things I could do I realize that sleeping hasn't crossed my mind yet. Sweet, wonderful, uninterrupted SLEEP! How about I do nothing but stay in my jammies, curl up in bed and close my eyes...guilt free.

I think many of us mom's feel guilty if we're not "getting things done" but we need and deserve the extra R&R. Let the dishes sit in the sink a little longer and let the toys lay scattered on the ground. De-stress and enjoy what I'm about to enjoy. SLEEP.

Goodnight...uh, I mean day? ...GOOD SLEEP!;)